There are many reasons why you might be wondering how to print replacement game covers. Maybe you’ve dropped your special edition copy of Skyrim into your pea soup? Or, maybe you dropped that case on purpose, out of great disdain for the cover art! 😬
Trust me, it’s happened.
Either way, you’ll need some supplies to get the job done such as some good-quality scissors, printing paper and, of course, a printer that’s up to the task. An Inkjet is typically the go-to here, but for total freedom, you’ll want to buy a sublimation printer.
With one of these, you can print directly onto a case – no slipcover required.
However, unless you’ve transformed replacing video game covers into a fruitful side hustle, chances are that you don’t have one of these printers lying around at home. So, how do you print a replacement video game cove with a regular inkjet printer?
Follow these 5 simple steps to print your game cover to a professional standard:
- Step 1: Find The Cover Design Online
- Step 2: Resize Cover Image
- Step 3: Find A New Game Case
- Step 4: Print Your New Game Cover
- Step 5: Cut Out Your Game Cover
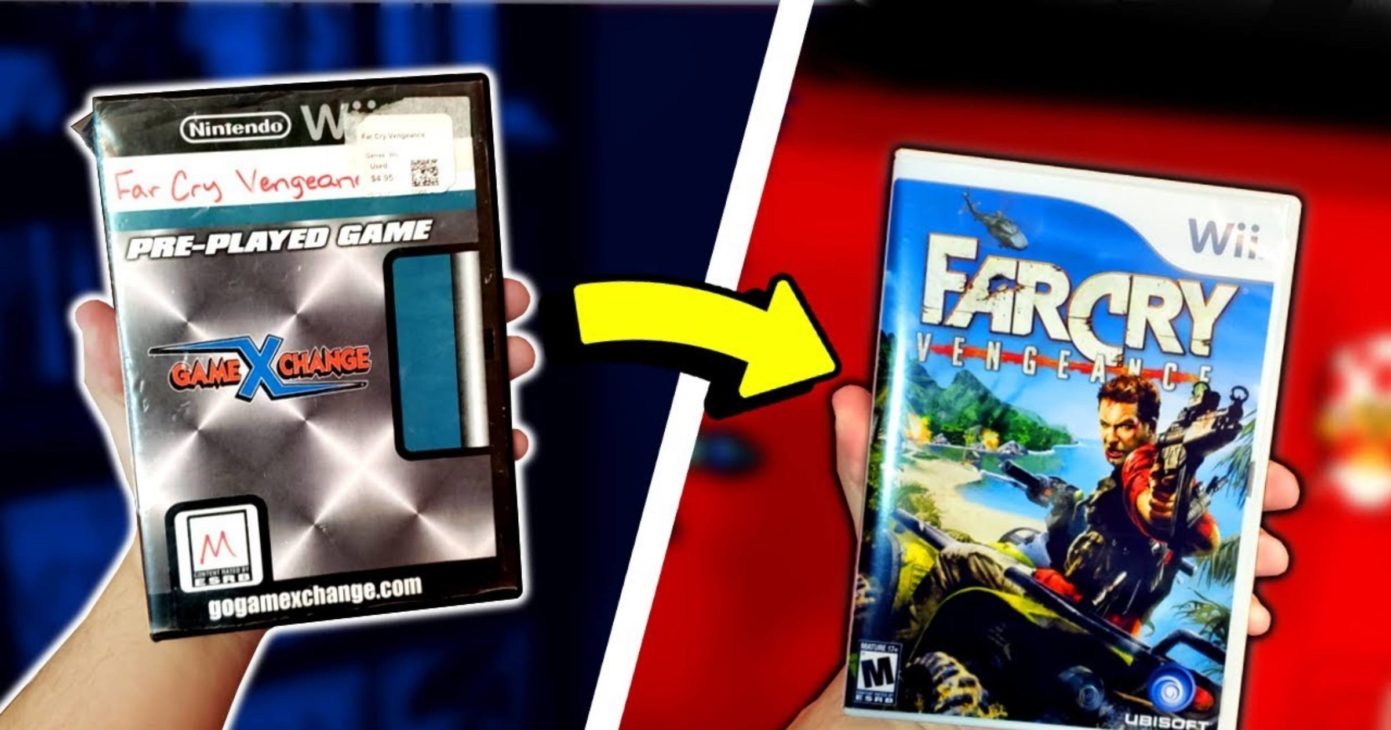
Step 1: Find The Game Cover Design Online
If you’ve damaged your cover, then even the highest-dpi scanner will be useless.
Instead, the first step to replacing your game cover will be to visit The Cover Project, where they’ve catalogued everything from Dance Dance Revolution to Death Stranding (Director’s cut). It’s the biggest and best collection of video game case art, and the forums are an invaluable resource too. That said, they’re not so exhaustive that they’re infallible, so your next stop should be VGBA.
If you’re going off-book and plan to make an original design, then you can definitely use the resources listed above as great reference points. Reddit’s r/customcovers thread may also provide plenty of inspiration to help get your own creative juices flowing. With a bit of a scan on the internet, I’m fairly confident you’ll find at least one person who has accurately designed the game cover you need to replace.
Step 2: Resize your cover art
Once you have found your video game cover design, it’s time to resize the image to match the dimensions of your video game case. Getting your digital image to print at the perfect size or dimensions to fit your game case is honestly the trickiest part of this process for many. Luckily, digital resources like The Cover Project have done most of the heavy lifting for you and provide game covers in a variety of sizes.
The Cover Project’s creator himself, Snowcone, has drawn up pixel-perfect blueprints for you to follow. Once you’ve found the dimensions for your chosen case, it’s as simple as following their five-step sizing guide for your selected photo editor.
Many creative platforms are covered, including Photoshop, Paint.net. Gimp, and the classic Microsoft Paint. More often than not, you’ll find that you won’t have to do any more than fit the pixel count and check your paper type before you go into print mode.
However, for the best results, I would recommend that you use a jpg to pdf converter online as there is much more flexibility when it comes to printing when using a PDF. After all, PDFs can be opened in applications such as Adobe Illustrator for anyone who really wants pixel perfection.
![]()
Step 3: Buy a new blank game case.
Often, a damaged game cover means a damaged case too.
Maybe someone decided to taste how bitter Switch cartridges really are and got carried away? Or, perhaps your precious game cases fell into the paws (or jaws) of your dogs. Whatever the reason, rest assured that all of your damaged game cases are indeed replaceable with a quick scan online.
General disc cases can be easily found and purchased almost anywhere, but for cartridges like those of the SNES or the Genesis, you’ll want to check out the universal game case or head to custom game case retailers.
For the more original case shapes, like the Nintendo DS, Xbox, PlayStation or Switch, you’ll have to be brave and buy off eBay, Etsy or a small Amazon seller.
Don’t forget to thoroughly read the reviews!
Step 4: Print your new replacement covers
During the sizing stage, you should have selected your paper size– which should be either A4 or legal paper. A4 paper is best as it fits most (if not all) game cases, so if you have it, use it. But what’s more important is the type of paper.
Printers and their respective papers can be a small labyrinth to navigate. An Inkjet will baulk at laser paper, a laser printer will smear Inkjet paper, and a sublimation printer wants nothing except heat-transfer paper. If you’re unsure about your printer’s paper, it’s best you double-check the manual before you end up with an abstract nightmare when it comes time to print out your replacement game cases.
Once you’re sure about which paper type you’ll need, you’ll then have to think about that paper’s finish. If you’re not looking to use heat transfer paper to print your replacement game covers directly onto your game cases, then we recommend grabbing some photo paper –glossy or matte will do. And be sure to avoid that rough, washed-out copy paper, which will drink deeply from your expensive ink supply and generally look lower quality than glossy or heat transfer prints.
To acquire the closest results to your original game case, you’ll need to track down some semi gloss/satin photo paper. Keep in mind, however, that this paper type is rarely sold outside of specialist printing stores, so unless you’re an authenticity addict, you’re best off with whatever photo paper you have at hand.
Step 5: Carefully cut your game covers
Now that you have printed your replacement video game cover, it’s finally time to prepare your final printed designs to be slipped right into their game cases.
For this, go ahead and grab some scissors if you’re feeling impatient or impish, but for the best results, we recommend using a ruler, a boxcutter and a cutting mat (or even a cutting board, if you prefer). With tools in hand, you might also like to use a spare game cover to check your specs and cut around; otherwise, line up your ruler and courageously cut away.
After that, it’s as simple as slipping the fresh cover into its game case and admiring your handiwork. Ta-da, you did it! You restored your game case!
Final tips on replacement game covers
Replacement video game covers are actually big business and once you’ve mastered the fundamentals, you’re ready for a little authorial flair.
Perhaps you might like to add a second design for clear cases like the Nintendo Switch? Or, a step further would be to take to Photoshop and redesign the box art however you like, for that extra personal touch. Heck, we’ve even seen designs where gamers have removed the cluttering of accolades and redesigned the entire casing like a Penguin Classics book cover!
Just know that once you start considering custom-coloured cases, or minimalist covers, you’re slipping into the world of interior design– Good luck!
Did you enjoy this tutorial? Check out some of our other tips and tricks!
- SSD vs HDD For Gaming: Which Is Best?
- How To Record Gameplay on PC
- Is 512GB SSD Storage Enough For Gaming?
- How To Not Rage At Games
- Is Backseat Gaming Bad?
- How To Cool Down Your Laptop While Gaming
- Are Ergonomic Gaming Chairs Worth It?
- Wired Vs Wireless Keyboard: Which Is Best?
- Are Wired Mice Better For Gaming?
- Ryzen 9 Vs Intel Core i9
Content Disclaimer: This guide on how to print replacement game covers has been independently written. GamePro has not been commissioned by any provider mentioned throughout this article, nor have we received content royalties. This includes financial payment, free advertising or recording software by way of gift.
Should you click on any link to a third-party website and make a purchase, we may receive a small commission. But that’s just how we keep this website alive! If you have any questions about printing replacement game covers, do not hesitate to hit the comments and we’ll be sure to respond back to you as soon as possible. Happy gaming!
